Installation Of The Base Plate With Pre-Installed Rotating Equipment?

Welcome Back to Our Series on Rotating Equipment

In our last chat, we tackled the nitty-gritty of aligning pre-installed rotating equipment, like pump sets. If you missed it, check out our Previous Post for some insightful tips. Today, let’s roll up our sleeves and get into the very foundation of proper installation—the base plate.

Why Installation Precision Matters

Let’s face it: no one intentionally installs their equipment incorrectly. Yet, the rush of modern business demands often pushes cost and speed to the forefront, sometimes at the expense of quality. No one has the time to develop and review equipment purchase specifications or installation procedures with their procurement departments. More often than not, the installation procedure is left to the bidding contractors to propose. This leads to price becoming the major determining factor. Incorrect installation can lead to operational issues, increased wear and tear, reduced efficiency, and even catastrophic failures.
A Step-by-Step Guide to Doing It Right

1. Inspecting the Base Plate

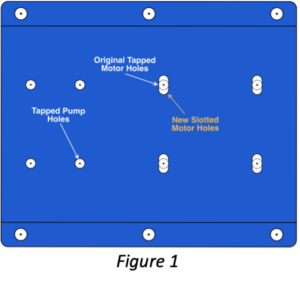
The best practice for installing the pump set starts with removing it from the base plate. Take a good look at the base plate for any signs of damage. It’s essential that the motor hold-down bolt holes are slotted (see Figure 1)—this is key for ensuring horizontal alignment later on.

 2. Placing the Base Plate

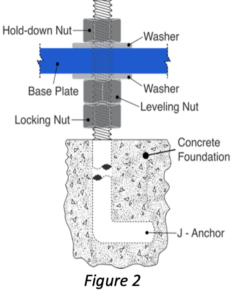
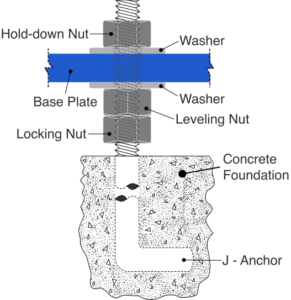
The base plate is placed on the foundation using the foundation anchor bolts. Before placing the base plate on the anchor bolt, ensure that two nuts and a washer have been added (see Figure 2).  Utilizing the leveling nuts with the aid of a precision level or laser-optical equipment, ensure that the base plate is installed level and flat. Once this is achieved, tighten the locking nuts towards the leveling nuts to freeze the base plate level and flat.

3. Securing and Grouting

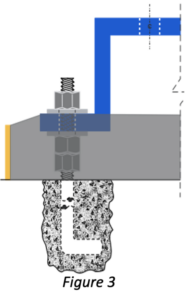
Now, secure the base plate with a washer and a hold-down nut on each anchor bolt. To really solidify the installation, build a frame around the base plate, leaving a gap of 1 to 3 inches. The top of this frame should sit a bit lower than the base plate, about ¼ to ½ inch. Pour the grout inside the framed area, ensuring it slopes away from the base plate, filling any gaps effectively (see Figure 3).

4. Reattaching and Aligning

After the grout has set, it’s time to reattach the pump and motor. I can’t recommend laser alignment enough. This method provides accurate measurements and makes adjustments quickly and efficiently. Trust me; you’ll thank yourself later for investing in this level of precision.

Let’s Keep Those Shafts Spinning Smoothly!

Don’t gamble with the alignment of your rotating equipment. For more guidance or to set up a chat about your specific needs, feel free to reach out to Anfield Industrial Solutions at 866-798-5033 or email us at support@anfieldis.com. Let’s keep those shafts spinning smoothly!

We Want to Hear From You

Ran into installation snags before? Or have some tricks up your sleeve? Drop us a comment below—we love hearing about your experiences and insights!

anfieldis.com